Picture this: you’re cruising down the highway, music blaring, when ping—a rock smacks your windshield, leaving a chip that’s threatening to spiderweb into a full-blown crack. Don’t panic!
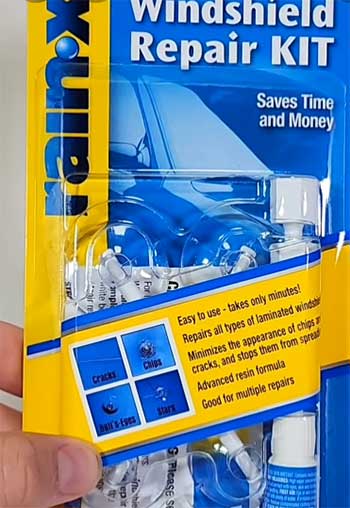
The Rain-X Windshield Repair Kit is your wallet-friendly, DIY savior. For less than the cost of a professional repair, this kit lets you tackle chips and cracks at home, keeping your windshield intact and your view clear.
Trust me, you’ll want this in your glovebox before the next rogue pebble strikes. It’s quick, effective, and a game-changer for any driver.
My Experience With The Rain-X Windshield Repair Kit
A few months ago, I was driving home from a weekend trip when a gravel truck ahead of me decided to play pinata with my windshield.
A small but menacing chip appeared, complete with tiny cracks radiating outward like a spiderweb.
I knew I had to act fast before it turned into a costly replacement job.
After some research, I grabbed the Rain-X Windshield Repair Kit from a local auto parts store, hoping it could save me from a $300 repair bill.
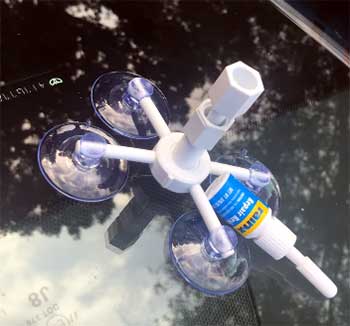
The kit comes with a small bottle of resin, a repair device with suction cups, curing strips, a razor blade, and a straightforward instruction sheet.
I’ll admit, I was skeptical.
Could a $15 kit really fix my windshield?
But I was determined to give it a shot.
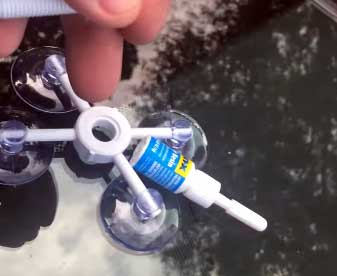
I parked my car in the driveway on a sunny afternoon, as the instructions emphasized curing the resin in direct sunlight. Cleaning the chip with rubbing alcohol to remove dirt was my first step, and I marked the spot with a dry-erase marker from both sides to keep track of it.
Setting up the repair device took a bit of finesse. The suction cups needed to stick firmly, and aligning the resin chamber over the chip was trickier than I expected. I fumbled a bit, but after a few tries, it was secure. I squeezed in four drops of resin, as suggested for a small chip, and screwed in the plunger to push the resin into the break.
Watching the air bubbles disappear was oddly satisfying—it felt like I was performing minor surgery on my car. After about 10 minutes, I applied the curing strip, moved the car into full sunlight, and waited another 10 minutes for the resin to harden.
The result? The chip was nearly invisible from the outside, and the cracks were barely noticeable unless I squinted. From the driver’s seat, I had to hunt for the repair spot.
It wasn’t perfect, but it was a massive improvement, and the damage hasn’t spread in the three months since. I even used the leftover resin to dab on a couple of tiny chips I hadn’t noticed before, which gave me peace of mind.
The process took about 30 minutes total, and I felt like a DIY hero. Sure, I made a rookie mistake by not pushing the resin deep enough at first, but once I got the hang of it, the kit worked like a charm.
About The Rain-X Windshield Repair Kit
The Rain-X Windshield Repair Kit is designed to tackle chips and cracks in laminated windshields, which are standard in most vehicles. Its advanced resin formula fills breaks, removes air, and bonds to the glass, making the repair stronger than the original damage.
Rain-X, a trusted name in automotive care since 1972, has built a reputation for reliable products like wiper blades and glass cleaners.
This kit is marketed as a quick, user-friendly solution for minor windshield damage—think round chips up to one inch in diameter or cracks up to 12 inches long.
It’s not meant for deep cracks, edge damage, or multi-layer glass, but for everyday dings, it’s a solid option.
The kit’s appeal lies in its simplicity.
You don’t need to be a mechanic to use it, and the process takes under an hour. The resin cures in sunlight, creating a clear, durable seal that minimizes the appearance of damage while preventing it from worsening.
At roughly $12-$15, it’s a fraction of the cost of professional repairs, which can range from $50 to $200. Plus, there’s enough resin for multiple fixes, making it a practical addition to your car maintenance arsenal.
Pros of The Rain-X Windshield Repair Kit
- Cost-Effective Solution
Let’s talk money. Professional windshield repairs can hit your wallet hard—$85 for a single chip isn’t uncommon, and replacements can cost hundreds. The Rain-X kit, at around $15, is a steal.
I fixed a chip and a few tiny dings with one kit, and there’s still resin left for future mishaps. For the price of a couple of coffees, you’re saving yourself from a much bigger expense. It’s the kind of value that makes you feel like you’ve outsmarted the auto shop.
- Easy to Use for Beginners
I’m no car expert, but the Rain-X kit made me feel like one. The instructions are clear, and the process is forgiving, even if you mess up a bit (like I did with the resin drops).
You don’t need fancy tools or skills—just a steady hand and some patience. The suction-cup device and curing strips do most of the heavy lifting. If you can follow a recipe, you can handle this. It’s empowering to fix your own car without calling in the pros.
- Effective for Small Chips and Cracks
The kit shines when it comes to minor damage. My chip was about the size of a dime, with small cracks branching out, and the resin filled it beautifully. The repair isn’t invisible, but it’s subtle enough that I forget it’s there most days.
More importantly, the damage hasn’t spread, even after weeks of driving in fluctuating temperatures. For round chips under an inch or cracks under a foot, this kit delivers reliable results.
- Portable and Reusable
The compact kit fits easily in your glovebox, ready for the next time a rock decides to target your windshield. I love that it’s not a one-and-done product—there’s enough resin for several repairs.
I used it on a few tiny chips I found later, and it worked just as well. It’s like having a first-aid kit for your windshield, giving you peace of mind on long road trips or gravel-heavy routes.
- Quick Application Process
Time is precious, and this kit respects that. From start to finish, my repair took about 30 minutes, including setup and curing. You’re not stuck waiting hours for the resin to dry—it cures in 5-10 minutes under direct sunlight.
I was back on the road in no time, feeling accomplished. For busy folks who can’t spare an afternoon at the repair shop, this speed is a major win.
Cons of The Rain-X Windshield Repair Kit
- Limited Effectiveness for Larger Cracks
While the kit worked wonders on my small chip, it’s not a miracle worker for bigger damage.
Cracks longer than 12 inches or deep, complex breaks are beyond its reach.
I read about someone trying to fix a long, radiating crack, and the resin didn’t fully fill the “legs” of the damage.
If your windshield looks like it’s auditioning for a spiderweb role, you might need to call in the professionals or consider a replacement.
- Application Can Be Tricky
I’ll be honest—getting the suction device aligned perfectly took a few tries. If you don’t position it exactly over the chip, the resin won’t flow properly.
I also learned the hard way that you need to push the resin tip deep into the chamber to avoid wasting it in the threads. For first-timers, there’s a bit of trial and error. An extra pair of hands or a YouTube tutorial can make a big difference.
- Not a Permanent Fix
The Rain-X kit is great for stopping cracks from spreading, but it’s not always a forever solution. My repair has held up for months, but some users report cracks reappearing after a year, especially in extreme weather.
The resin strengthens the glass, but it’s not as durable as a professional repair. Think of it as a Band-Aid—effective for now, but you might need a replacement down the road.
- Weather Dependency
You need a sunny day for the resin to cure properly, which can be a hassle if you live in a rainy climate or it’s winter. I got lucky with a clear afternoon, but I’ve heard stories of people struggling in cold or cloudy conditions.
Warming the resin with a hairdryer can help, but it’s an extra step. If the weather’s not cooperating, you’re stuck waiting for better conditions.
Comparison With Other Windshield Repair Kits
- Permatex Windshield Repair Kit
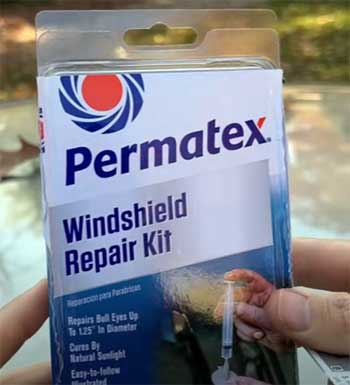
Permatex is another big name in the DIY repair game, and their windshield repair kit is a direct competitor to Rain-X.
I tried Permatex on a friend’s car, and it uses a syringe-based applicator to create a vacuum and force resin into the crack.
This can be more effective for star-shaped chips, as the syringe ensures deeper penetration.
However, the process felt more complex, with multiple steps to manage the syringe’s pressure.
Rain-X’s suction-cup device, while sometimes finicky, is simpler for beginners.
Permatex also includes less resin, so you’re limited to one or two repairs.
If you’re dealing with a tricky chip and don’t mind extra steps, Permatex might edge out slightly, but Rain-X wins for ease and value.
- 3M Windshield Repair Kit
3M’s kit is marketed as a premium option, often priced a few dollars higher than Rain-X. It includes a similar resin formula and applicator, but the instructions emphasize precision, which can feel intimidating for newbies.
I found 3M’s curing strips thicker and easier to handle than Rain-X’s, which tended to bubble if not applied carefully. However, 3M’s kit is designed for smaller chips—think half an inch—and struggles with longer cracks.
Rain-X offers more versatility for cracks up to 12 inches. If you’re a perfectionist with a tiny chip, 3M could be your pick, but Rain-X is more forgiving for varied damage.
- Blue-Star Windshield Repair Kit
Blue-Star’s kit is a budget-friendly alternative, often under $10. I tested it on a small chip on my old van, and while it got the job done, the resin quality felt inferior. It cured with a slightly yellowish tint, making the repair more noticeable than Rain-X’s clear finish.
Blue-Star’s applicator is basic, with no suction mechanism, so you’re relying on gravity to push the resin in. This worked for shallow chips but failed to fill deeper breaks.
Rain-X’s advanced resin and suction device make it a clear winner for durability and aesthetics, especially if you value a near-invisible repair.
- Crack Eraser Windshield Repair Kit
Crack Eraser is a lesser-known brand that’s gained traction online for its professional-grade claims. I haven’t used it personally, but reviews suggest it’s effective for complex chips thanks to its dual-resin system—one for filling, another for sealing.
However, it’s pricier, often around $25, and requires more setup time. Rain-X, by contrast, keeps things simple and affordable, with comparable results for standard chips and cracks.
Crack Eraser might appeal to enthusiasts tackling serious damage, but for most drivers, Rain-X delivers similar performance without the extra cost or complexity.
Maintenance Tips For Your Repaired Windshield
- Clean the Windshield Regularly
After using the Rain-X kit, keep your windshield spotless to maintain the repair’s integrity. Dirt and grime can weaken the resin over time. I use a glass cleaner and microfiber cloth every couple of weeks to remove smudges and road dust.
Avoid abrasive cleaners or rough sponges—they can scratch the glass or dislodge the resin. A clean windshield also makes it easier to spot new chips early, so you can address them before they spread.
- Avoid Extreme Temperatures
Temperature swings can stress the repaired area. I learned this when I parked my car in freezing weather right after the repair—thankfully, the resin held, but it was a risk. Try to park in a garage or shaded area during heatwaves or cold snaps.
If you’re fixing a chip in winter, warm the resin bottle in your hands or use a hairdryer on low to ensure it flows properly. Consistent temperatures help the repair last longer.
- Inspect the Repair Periodically
Every month or so, I check my repaired chip from both sides of the windshield, especially after heavy rain or rough roads. Look for signs of cracking or resin discoloration.
If you notice the damage spreading, apply more resin if you have some left, or consult a professional. Catching issues early can save you from a full replacement. I also mark the repair spot with a small sticker inside the car to remind me where to look.
- Use Rain-X Glass Treatment Sparingly
Rain-X’s hydrophobic glass treatment is great for repelling water, but don’t apply it immediately after a repair. The instructions warn that glass treatments can interfere with the resin if used too soon.
I waited a week before applying Rain-X to my windshield, and it worked fine. When you do use it, apply it lightly around the repaired area to avoid stressing the resin. This keeps your windshield clear without compromising the fix.
- Drive Cautiously on Rough Roads
Rough terrain can jostle a repaired windshield, causing cracks to reappear. I avoid gravel roads when possible, especially after a fresh repair. If you can’t dodge bumpy routes, drive slowly to minimize vibrations.
For off-road enthusiasts, consider a professional repair or replacement, as DIY kits like Rain-X aren’t built for constant high-impact stress. A little caution goes a long way in preserving your repair.
Frequently Asked Questions (FAQ)
Yes, they do, but with caveats. I’ve seen the Rain-X kit stop chips and small cracks from spreading, making them less noticeable. The resin fills the break, strengthens the glass, and holds up against weather and driving stress. However, they’re not a cure-all. Deep cracks, edge damage, or chips in the driver’s line of sight often need professional attention. For minor damage, kits like Rain-X are effective, affordable, and worth trying before shelling out for a replacement.
From my experience, Rain-X stands out for its balance of ease, affordability, and effectiveness. It’s user-friendly, works on chips and cracks up to 12 inches, and delivers near-invisible repairs. Permatex is great for complex chips due to its syringe applicator, while 3M offers precision for tiny dings. Blue-Star is cheaper but less durable. For most drivers, Rain-X’s versatility and value make it the top choice, especially if you’re new to DIY repairs.
The curing process is quick—about 5-10 minutes in direct sunlight. After applying the resin and curing strip, I parked my car in the sun, and the resin hardened in under 10 minutes. If it’s cloudy or cold, it might take longer, and you may need to warm the resin first. The entire repair, including setup, took me about 30 minutes, making it a fast fix for busy days.
The repair’s longevity depends on the damage, weather, and driving conditions. My Rain-X repair has held strong for three months with no spreading, and some users report success for up to a year. However, it’s not permanent—extreme temperatures or rough roads can weaken the resin over time. Regular maintenance, like cleaning and inspecting the repair, can extend its life, but you might eventually need a professional fix or replacement.
Conclusion: Why You Need the Rain-X Windshield Repair Kit?
If you’ve ever winced at a windshield chip, the Rain-X Windshield Repair Kit is your answer. It’s affordable, easy to use, and effective at stopping minor damage in its tracks. For less than $15, you’re saving hundreds on repairs while keeping your windshield safe and clear.
Whether you’re a DIY newbie or a seasoned car enthusiast, this kit belongs in your toolkit. Don’t wait for that chip to become a crack—grab Rain-X and take control of your windshield’s fate.