You should buy Chassis Saver if you want a rugged, industrial-grade coating that is incredibly forgiving of imperfect surface preparation, but you should choose POR-15 if you prefer a high-gloss, ceramic-like finish and have the patience for a multi-step chemical cleaning process.
I have found that for many of you, the choice comes down to how much time you want to spend scrubbing versus painting.
In this article, I will analyze the durability, application quirks, and real-world performance of both to ensure your vehicle survives the road salt.
Comparison Overview: Chassis Saver Vs. POR-15
| Feature | Magnet Paints Chassis Saver | POR-15 Rust Preventive |
| Chemistry | Single Component Urethane | Moisture-Cured Urethane |
| Primary Prep | Wire brush (remove loose scale) | Degrease, Etch, Rinse, Dry |
| UV Resistance | Sensitive (will chalk in sun) | Sensitive (will chalk in sun) |
| Finish Texture | Thick, slightly textured | Thin, smooth, glass-like |
| Cure Time | 3-8 Hours (Humidity dependent) | 2-5 Hours (Humidity dependent) |
| Solvent Needs | S8 Reducer | POR-15 Solvent / Solvent VM&P |
| Color Depth | Industrial Jet Black | High-Gloss or Semi-Gloss Black |
| Application | Brush, Roll, or Spray | Brush, Roll, or Spray |
My Personal Experience with Frame Restoration

I remember the first time I crawled under my old 4×4 with a wire wheel and a face shield, wondering if I was actually going to save the metal or just make a mess.
I am a person who values efficiency, so I initially started with Chassis Saver because a local body shop told me it was the “lazy man’s” best friend.
I noticed immediately that Chassis Saver has a very high viscosity; it feels heavy on the brush and fills in those deep pits in rusted metal with surprising ease.
I found that after a quick wire brushing and a wipe-down with some solvent, the paint bit into the rust and didn’t let go.
I realized, however, that when I started working on a show-quality classic car, the “industrial” look of Chassis Saver wasn’t exactly what I wanted for the suspension components.
I eventually tried POR-15, and I noticed that the experience was much more involved.
I found that I couldn’t just “paint over” the rust; I had to follow the three-step dance of degreasing and etching to get the bond I wanted.
I am someone who appreciates a mirror-like finish, and I noticed that POR-15 leveled out so perfectly that it looked like it had been professionally powder-coated.
I eventually found myself in a situation where I was working in a very humid garage during a rainy spring week.
I noticed that both products are moisture-cured, which means they actually use the water in the air to harden.
I realized that if I left the lid off either can for more than twenty minutes, I was asking for trouble.
I found that Chassis Saver was a bit more stable in the open air, whereas POR-15 seemed to start skinning over almost instantly.
On the other hand, I noticed that once POR-15 cured, it was slightly harder and more resistant to scratches from a stray wrench.
I finished my testing season realizing that both products are essentially “liquid gold” for stopping oxidation.
I eventually noticed that on my daily driver, the Chassis Saver held up better against road gravel because the coating felt a bit more “rubbery” and impact-resistant.
I realized that on the classic car, the POR-15 was the right choice because it stayed looking “new” longer under the hood.
I found that the secret isn’t just the paint itself, but how well you understand the chemistry of the metal you are trying to protect.
Maintenance Tips for Frame Coatings
- Degrease with Water-Soluble Cleaners: You should realize that any oil residue will ruin the bond of these urethanes. Using a heavy-duty degreaser and rinsing with hot water is a vital maintenance tip for surface preparation, which I found ensures the paint actually bites into the metal pores.
- Always Use a Zinc-Phosphate Etcher: You should notice that smooth metal has no “tooth” for the paint to grab. Applying a metal prep solution that leaves a phosphate coating is a key maintenance tip for POR-15 users, which results in a chemical bond that is nearly impossible to break.
- Stir, Never Shake the Can: You should realize that shaking creates air bubbles that can become trapped in the thick film. Using a clean wooden stick to stir slowly is a smart maintenance tip for a smooth finish, which I found prevents “pinholing” once the paint dries.
- Apply Two Thin Coats Instead of One Thick One: You should notice that “glopping” the paint on can trap gases and lead to a soft, gummy finish. Waiting for the first coat to become “finger-drag” tacky before applying the second is an essential maintenance tip for curing, which provides the strongest final shell.
- Seal Your Cans with Plastic Wrap: You should realize that even a tiny amount of humidity in the can will ruin the remaining product. Placing a piece of heavy plastic over the opening before hammering the lid on is a great maintenance tip for longevity, which I found saves you a lot of money.
- Wash the Undercarriage Every Spring: You should notice that road salt is the enemy of any coating. Using a high-pressure hose to clear off the winter brine is a crucial maintenance tip for your vehicle’s health, which results in your frame looking “just painted” for a decade or more.
Pros and Cons of Chassis Saver: The rugged workhorse
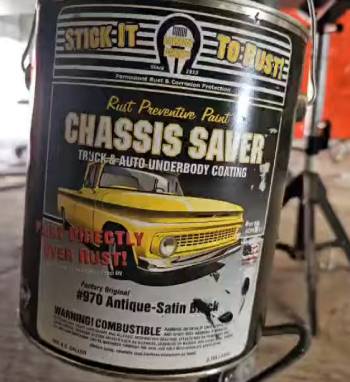
Pros of Chassis Saver: The rugged workhorse
- Forgiving Surface Tolerance: It features a high-solids formula that thrives on “tight” rusted surfaces: I found that I didn’t need to get the metal perfectly clean to get a permanent bond: this results in a much faster turnaround for truck frames and utility trailers: I noticed that it actually performs better on rust than on smooth, bare steel.
- Superior “Build” and Filling Power: It utilizes a thick consistency that levels out the uneven texture of heavily pitted metal: I found that two coats could make an old, “scaly” frame look smooth again: this provides a cosmetic improvement along with the protection: I noticed it covers sharp edges better than thinner liquids.
- Impact and Vibration Resistance: It features a cured state that is incredibly tough but maintains a microscopic level of flexibility: I found that it didn’t chip when I hit it with a hammer or drove over gravel: this results in a more durable barrier for off-road vehicles: I noticed the coating absorbs energy rather than cracking.
- Cost-Effective Application: It utilizes a simpler one-step process where you can often skip expensive metal etchers: I found that I saved about 30% on total material costs compared to multi-step systems: this provides a high-value solution for large projects like heavy equipment: I noticed that a single quart goes much further than expected.
- Stable Shelf Life in Sealed Cans: It features a chemistry that is slightly less volatile when it comes to “welding” the lid shut: I found it easier to reopen and reuse after a few weeks: this results in less wasted product for small touch-up jobs: I noticed that it doesn’t form a “puck” inside the can quite as fast as other urethanes.
Cons of Chassis Saver: The trade-offs for grit
- Susceptibility to UV Light: because the urethane bonds will break down and turn “ashy” if exposed to direct sunlight: I found that I absolutely had to topcoat any part of the vehicle that wasn’t hidden under the body: this provides an extra step for external bumpers or roll cages: I noticed it doesn’t affect the protection, but it looks terrible after a month in the sun.
- High VOC and Strong Odor: because the formula contains heavy-duty solvents designed for industrial use: I found the smell to be very potent even in a ventilated shop: this results in a mandatory need for a high-quality respirator: I noticed the fumes can linger in a closed garage for several days.
- Longer Curing Intervals: because the high solids take more time for the solvents to flash off completely: I found that I had to wait at least 8 to 12 hours before I could safely handle the parts: this provides a slower workflow if you are trying to assemble a vehicle in a weekend: I noticed that temperature drops really slow it down.
- Difficult to Spray Without Specialized Reducer: because the paint is so thick out of the can: I found that I had to buy the proprietary S8 reducer to get it through my HVLP gun: this results in an additional expense if you don’t like brushing: I noticed that using “generic” thinners can cause the paint to fisheye or fail to cure.
- Limited Aesthetic Finishes: because it is primarily an industrial product designed for frames: I found that it doesn’t offer the same “show car” variety of gloss levels: this provides a very functional, utilitarian look: I noticed that if you want a subtle satin or semi-gloss, you have to be very careful with your application thickness.
Pros and Cons of POR-15: The ceramic-hard shield
Pros of POR-15: The ceramic-hard shield
- Extreme Chemical Resistance: It features a non-porous finish that is completely impervious to gasoline, brake fluid, and battery acid: I found this to be the best choice for engine bays and fuel tank exteriors: this results in a barrier that won’t “melt” if you have a mechanical leak: I noticed that even harsh degreasers didn’t dull the shine.
- Rock-Hard Surface Hardness: It utilizes a moisture-cured resin that dries to a finish almost as hard as glass: I found that it is very difficult to scratch with a screwdriver or tool: this provides a permanent “encapsulation” of the rust: I noticed that it creates a structural seal that feels like an exoskeleton.
- Excellent Self-Leveling for Brushing: It features a thin, watery consistency that flows out perfectly flat: I found that I could get a “sprayed” look even when using a cheap foam brush: this results in a professional-grade aesthetic without the mess of a spray gun: I noticed that brush marks completely disappear within five minutes of application.
- Proven Long-Term Legacy: It utilizes a formula that has been the industry standard for over 40 years: I found comfort in knowing that thousands of restorations have used this with success: this provides a high level of confidence for high-value classic cars: I noticed that the community support and “how-to” guides are endless.
- Great Heat Tolerance: It features the ability to handle temperatures up to 450°F: I found it worked well on cast iron engine blocks and differential covers: this results in a versatile coating that won’t bubble near the exhaust: I noticed it kept its gloss even after several heat cycles.
Cons of POR-15: The price of the system
- Extremely Strict Prep Protocol: because the paint relies on a chemical bond to the etched metal: I found that if I didn’t use the “Metal Prep” solution, the paint would peel off like a sticker: this results in a high failure rate for “shadetree” mechanics who rush the job: I noticed that it hates smooth, un-etched steel.
- Permanent Skin “Tattooing”: because the paint bonds to the moisture in your skin instantly: I found that if I got a drop on my arm, it stayed there for two weeks regardless of scrubbing: this provides a messy and annoying cleanup process: I noticed that wearing long sleeves and double-nitrile gloves is essential.
- Brittle Nature on High-Flex Parts: because the coating is so hard and glass-like: I found that it can occasionally crack or flake on leaf springs or parts that bend significantly: this results in a potential breach in the armor: I noticed that it doesn’t “give” as well as the more rubbery Chassis Saver.
- Lid Welding Phenomenon: because the moisture in the rim of the can will seal the lid permanently after one use: I found that I had to use plastic wrap between the lid and the can to avoid having to cut the can open next time: this provides a frustrating storage experience: I noticed many people just throw away half a can because they can’t get it back open.
- Requires UV-Stable Topcoat for Sun Exposure: because, like all aromatic urethanes, it will degrade in sunlight: I found that it turns a milky grey color within weeks of exposure: this results in the need for a “Topcoat” or “Chassis Black” spray over the initial layer: I noticed this effectively doubles the work for external components.
Also Read: Comparison Of Por 15 Vs. Rustoleum
Comparison with Others
- Chassis Saver Vs. Rust-Oleum
I found that Rust-Oleum is a great budget option for lawn furniture, but it lacks the chemical cross-linking of Chassis Saver.
You should realize that Rust-Oleum is an oil-based enamel that stays relatively soft.
I noticed that Chassis Saver is a “moisture-cured urethane” which I found to be ten times more durable against rock chips.
I believe that Chassis Saver is the better choice for you if you are doing actual automotive work, while Rust-Oleum is just for cosmetics.
- POR-15 Vs. Eastwood Rust Encapsulator
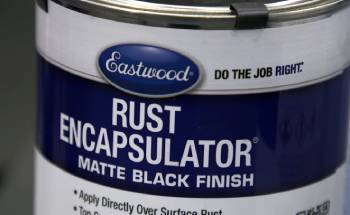
I noticed that Eastwood‘s version is much easier to apply because it comes in an aerosol and doesn’t require a three-step prep.
I found, however, that Eastwood is not as hard or chemical-resistant as POR-15.
You should realize that Eastwood is more “forgiving” of light oil, but I noticed it doesn’t last as long in harsh salt environments.
I believe that Eastwood is the better analytical choice for you for quick touch-ups, but POR-15 is the winner for a total restoration.
- Chassis Saver Vs. Corroseal
I found that Corroseal is a water-based converter that turns rust into a black primer.
You should realize that Corroseal is much safer and easier to clean up with soap and water.
I noticed, however, that Corroseal is not a “final” coating and I found it must be painted over to be durable.
I believe that Chassis Saver is a superior “one-and-done” product for you, whereas Corroseal is just the first step in a longer process.
Frequently Asked Questions (FAQs)
For those who want less prep work, Chassis Saver or Rust Bullet are often considered “better” because they bond better to imperfectly cleaned metal.
It is extremely durable; it is designed for industrial and marine environments and can last 10+ years on a vehicle frame if applied correctly.
Yes, it is specifically designed for automotive frames and offers one of the hardest, most chemical-resistant barriers against rust on the market.
It typically becomes tack-free in 3 to 4 hours and fully cures in 24 hours, though high humidity will accelerate this process significantly.
Final Thoughts
You should buy Chassis Saver if you want a “blue-collar” solution that is tough as nails and doesn’t require a laboratory-clean environment to work.
I have found that for most of you, POR-15 is the better choice if you are performing a high-end restoration where the “look” of the frame is just as important as the protection.
I believe that as long as you respect the moisture-curing nature of these paints and wear your safety gear, you will win the war against rust.